Cooking Lesson: How to Make Chocolate at Home
 “Nine out of ten people like chocolate. The tenth person always lies.” – John Q. Tullius
Life is like a box of chocolates - those that you can make yourself (by hand and from heart). The good thing about making chocolates at home is that you can experiment with flavours you fancy and perhaps don’t exist. Think wasabi with chocolate or floral bars.
Psst… I always fancied myself as a bit of a chocolatier. Chocolate making is very much an art and science. And so, I went straight to the best women in business to learn the tricks of the trade and put my artistic skills to work. If you’re in love with the sweet stuff as much as I am, you’re welcome.
The story of chocolate
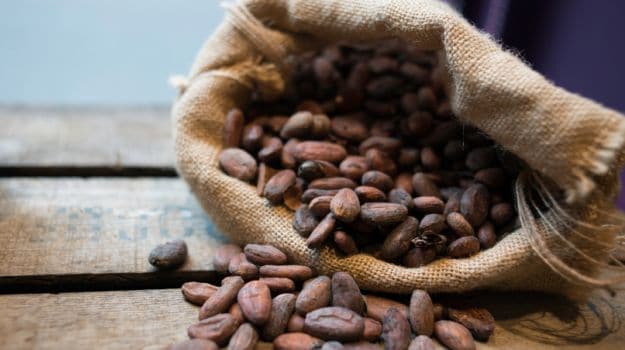
“The Cacao tree is the source of all things chocolate. The fruit of the Cacao tree is a football-shaped pod which contains seeds called beans. The cocoa beans are fermented and sun-dried before being shipped to the chocolate factory. Here the beans are roasted in a steam of hot air to give them their signature deep brown colour and aroma. The part of the bean needed to make chocolate is the portion inside, called the nib. After roasting, the beans are crushed to release the internal nib from the shells,” explains Arti Dhingra, Principal Chocolatier at Art Chocolat Academy in New Delhi.
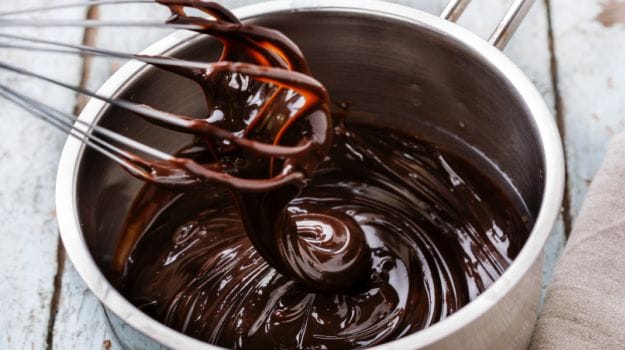
We’re not done yet. “The nibs are ground into thick brown liquid called cocoa liquor, which is further milled to release cocoa powder and cocoa butter. These constituents are re-combined along with additives and stirred continuously in a process called conching, which gives the finished chocolate its smooth, silky texture. This mixture can then be moulded into chocolate bars, poured over individual confectionery items, shaped into various forms, used as liquid syrup or as an ingredient in chocolate ice cream,” she shares. Based on the amount of cocoa and milk solids, chocolate can be further classified into dark, milk and white.
(The Raw, Dark Truth About Chocolate)
So where do we start? With a bar of good quality chocolate. There’s Couverture Chocolate and there’s Compound Chocolate. Compound chocolate replaces the two main ingredients found in real chocolate. It contains cocoa powder instead of chocolate liquor and substitutes cocoa butter with oil. “Compound chocolate is a less-expensive non-chocolate product replacement. Most brands in the market use the same – they use oil as an alternative to cocoa butter which is why you may have noticed that they refrain from using the word ‘chocolate’ and call them chocolate confections,” says Kishi Arora from Foodaholics. It is used commonly as it melts very easily while couvertures require tempering.
(Why Some Chocolates Melt and Some Don't)
It’s also a matter of taste. Most people can’t tell, but when tasted together the difference is quite evident - couvertures are naturally rich. If you find chocolate-making too steep a challenge, choose compound for less stress and couverture to impress.
How and why to temper chocolate
Chocolate is available in the form of slabs or callets of varying quality and compositions. Tempering or melting them is the first step of making chocolate and the most critical one. Couvertures need tempering - a process of heat treating. If you heat and cool chocolate without controlling the temperature it will result in different sized crystals with white patches called fat bloom and a crumbly texture. It may not even set properly. “Tempering gives the chocolate more sheen and a firmer ‘snap’ when broken with a creamy mellow flavor,” says Kishi Arora from Foodaholics.
Chocolatier Arti Dhingra helps us understand this essential skill, "Put 2/3 of the chocolate in a glass bowl. Microwave at medium–high power for 30–second periods, stirring with a rubber spatula in the intervals, until 3/4 of the chocolate is melted for about 1 1/2 minutes. Stir the chocolate until completely melted, then scrape it into a clean, dry, room temperature bowl. Measure the temperature of the chocolate with an instant–read thermometer; it should be between 40*C. Add the remaining chocolate in large handfuls, stirring constantly until the chocolate is at 37 degrees. If the chocolate becomes too cool, melt a few more tablespoons of chopped chocolate and stir them in to raise the temperature. Dip the tip of a knife in the chocolate; the chocolate on the knife should begin to set within 1 minute. Use at once.”
The process can be tricky and needs attention. You have glowing, thick chocolate of the perfect consistency one minute but a little extra heat and this can transform into a muddy mess floating in oils. “Keep track of its temperature to avoid over-heating. Otherwise, it will ruin the taste and texture of the final output, which is the reason why he keeps a thermometer while melting the chocolate in indirect heat or in short intervals in a microwave. When handling chocolate do not let it come in contact with water while melting. Water droplets will cause it to turn hard or lumpy. Do not use a wooden spoon to stir chocolate, because it retains odour and moisture, which will destroy the chocolate,” suggests Arti.
When melting compound chocolate, make sure your chocolate is chopped into small uniform pieces. Always melt on low heat because if it is too high the chocolate will zip right past the melting stage and become hard. It is easiest to melt chocolate in a microwave but it’s the riskiest too. “Run the microwave in 30 second increments, stirring in between and rotating the bowl if necessary. As a rough guide, you will need to microwave every ounce (28 grams) of chocolate for about 1 minute,” recommends Arti. You can even choose to use a double boiler or invest in a professional electric melter.
If you think making chocolate is something only experts can do, you couldn't be more wrong. You only need the best ingredients, a dose of patience and some creativity to roll away to chocolate paradise
.
No comments:
Post a Comment